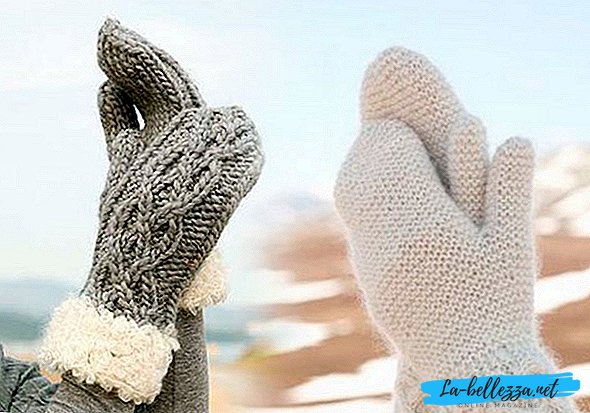
Mittens have always been the most practical and comfortable for a cold winter. Today the stores have a huge selection of mittens for the whole family, but it is much more pleasant to wear things that were created with love with your own hands.
Having learned to knit, you can create whole sets: hat, scarf, mittens. They will harmonize beautifully with each other if they are made in the same style with the same pattern.
I propose to go directly to the discussion of the topic: "how to knit mittens with knitting needles - step by step instruction."
How to knit mittens with needles (for beginners step by step)
In order to learn how to knit beautiful stylish mittens, you need to learn how to knit the most simple ones, on the basis of which you can create the most original models for the whole family.
Seamless mittens - master class with a detailed description (photo)
The most interesting thing is that even lazy can cope with this model. They may be plain, but the author suggests adding a few red stripes for a change.
For work we need a wool thread (70 g), 5 stocking needles No. 3.
The author knitting density =1,7 loops in 1 cm. Next, you need to measure the girth of the brush, but we will knit for the hand, the girth of which is equal to 20 cm.
The product knits from top to bottom on five knitting needles, with the result that it will be obtained without a seam. Calculate the number of loops:20 x 1,7 = 34 loops. Distributed into 4 needles 34 loops. I propose to round and score 36 loops, so we can do by 9.
To facilitate the explanation, we give each spoke a sequence number. Closing the circle, we knit four loops of the 1st knitting needle together with the end of the yarn left over from the 4th knitting needle from a set of loops so that the circle on the edge will close more closely.
Let's start with right part. We assume that on the 1st and 2nd needles - the loop of the lower part of the mitten, and on the 3rd and 4th - the top. We begin the work with a rubber band, which we knit 1 × 1 (1 front, 1 wrong). The height of the gum or cuff 7 cm.
Next, go to the knitting of the main part of the mitten: knit in a circle with facial loops to the base of the thumb 5 - 7 cm, depending on size.

The thumb will knit on the 1st needle, for the left - on the 2nd. To do this, we knit the first loop with the thread of the main color on the 1st spoke. All the other loops, except the last, knit with facial colored thread. Then we return the loops connected by a color thread to the 1st knitting needle and once again knit the main thread. We receive a color dash. This will be further hole for the thumb. Next, just knit to the little finger (about 8 cm).

Then proceed to turning down the loops on the toe mittens. On the 1st and 3rd spokes at the beginning, we knit the first two loops together with the front one in the second way (behind the back walls), having first turned over the 1st loop. On the 2nd and 4th knitting needles we knit two loops together at the end of the spokes of the front one by the first method (behind the front walls). So we make a decrease of loops through the circle, until each needle has a half number of loops (in our case, when the number of loops on each spoke is odd, through the circle we reduce the smaller part - 4 loops), then decrease the loops in each circle (5 loops). In this case, on the 1st and 3rd spokes, in those rows where the loops do not subtract, the first loops are also inverted and knit in the first way. When there are 2 loops on each spoke, we tighten the loops and fasten it on the wrong side.
Now proceed to thumb knotting. To do this, gently pull the colored thread out of the hole of the thumb. Then we enter two needles into the released loops, we get 7 loops on the lower needle, 6 on the top. and the 4th spoke will also have 4 loops (3 + 1 from the side edge of the hole). To make it more convenient, the end of the working thread can be lowered into the hole (on the wrong side of the product).

We continue to knit a finger in a circle until the middle of the nail, and then we begin to reduce the loop in the same way as when knitting toe mittens: on the 1st and 3rd knitting needles at the beginning, on the 2nd and 4th knitting needles at the end, but decreasing do in every row. When each needle remains on the 1st loop, the loops are tightened and fastened on the wrong side.
Left mitten it knits in the same way as the right, but in a mirror image: we knit a hole for the finger on the 2nd spoke.
Step by step instructions for knitting on two needles
These long mittens knit and two needles. You can separately connect the two parts with the subsequent connection of the halves, but we consider an option where you have to make only one inconspicuous seam (it will be correctly and visually more beautiful).
Necessary: yarn, knitting needles, pin and plain knitting, measuring tape, hook, needle.

Let's start with the right part.
We measure the circumference of the wrist, the length of the palm and thumb. It is also necessary to measure the density of knitting, knitting a little. We measure how many loops fall on 1 cm. I have a girth of 20 cm, in 1 cm - 2 loops. You need 40p-4 = 36p + 2 edge set.
We start from the bottom with a 2x2 gum (2 face, 2 purl). It turned out about 10 cm (15 rows).

Next, go to the main canvas, where you can choose needles of smaller diameter. In the second row, add 4 loops evenly. Next, knit just 7 rows to the base of the thumb. You can try and, if necessary, tie more / less.
The finger in the mitten is not on the side, but as if not much closer to the palm, so for the right mitten we knit as follows.

- A. - Edge, 2n. we knit on the drawing and remove it to a regular sewing pin.
- B. - For a finger, 6-7 loops are taken. Depending on the completeness. We knit 7 loops according to the pattern, and remove all the rest to the pin.
- V. - we have only 7 thumb loops on the working needle.
We knit the main pattern in height, without an edge !!! !!! finger length is multiplied by 2. I have a finger of 6cm * 2 = 12cm in height. Out 21 series. FIRST AND LAST KNIFE ON DRAWING !!! Return the loop to the needle with a large pin.

Knitting to the end of the row in the picture. Next, knit on the picture the required number of cm. To the place where the little finger ends. I have 16 facial rows. Try on and check the size.

We divide all the loops by 2. One part is removed on a pin.

Getting down to reduction.

Edge, 1p. according to the drawing, 2p. together, then according to the picture, when the needle remains 4p. we knit 2 together, 1 according to the figure and the last, as an edge purl.
Purse knit knit by drawing. I have not needles 20 loops. I knit so, edging, front, 2 together, 12 facial, 2 together, 1 front, 1 workout. The result is 20 loops. We shorten it in each front row until 6-8 loops remain on the spoke. I have 7.

Close the loop and do the same procedure with the second half. In order to finish correctly, simply knit two loops together, shifting the knit on the main knitting needle.

Next, do the final work. We sew a finger and the mitten itself.

From these lessons we can conclude that not such a complicated knitting. Knitting mittens requires basic knowledge and some free time.
Mitten knitting needles with a pattern (diagrams and description)
Having learned to knit the simplest models, you can dilute them with beautiful patterns, giving free rein to your imagination. In the article "Patterns and knitting patterns (description)" you will find them in large numbers.
And now I propose to switch to more complex mittens with knitting needles (diagrams and description will help you understand this difficult task).
How to tie beautiful mittens with braids for women
Mittens with braids knitting scheme and description for lovers of the classics.
Pigtail will be the main decoration. We have chosen a simple braid, but if you are not afraid of difficulties, you can choose a more complex and original version.
Yarn - acrylic (possible from angora), approximately 70 g .; stocking needles number 3.5.

Pattern "gum": 2 persons., 2 out.
Knitting pattern "braids": Cross the 8 loops to the left (leave 4 loops on the auxiliary spoke before work, 4 faces. And tie the loops with the auxiliary knitting needles).
Cross the 8 loops to the right (leave 4 loops on the auxiliary spoke at work, 4 faces. And tie the loops with the auxiliary knitting needles).
Dial 48 points and distribute them on the stocking spokes, it turns out on each needle 12 loops. Knit a gum pattern of 3.5 cm (if you have a little gum, knit more cm).
Then, proceed to the knitting of the main pattern. For the convenience of knitting the “braid” pattern, I move the loops from the 1st and 2nd knitting needles to one needle. Those. My loops are distributed on 3 needles (and not on 4 needles), on the first needle there are 24 loops of the main pattern, and on the 2nd and 3rd needles from the side of the palm there are 12 loops each.
So, the first row after the elastic begins with the needles on which there are 24 loops, we begin to knit the main pattern.
1-6 row: 1 person., 2 w., 8 people., 2 w., 8 people., 2 w., 1 person., Loops on 2 needles from the palm side, we knit the faces.
7th row: 1 person., 2 out., 8 loops to cross over to the left, 2 out., 8 loops to cross over to the right, 2 out., 1 persons., Loops on 2 spokes from the side of the palm we knit the faces. Repeat rows 1-7 throughout the work.

At a height of 10 cm from the start of knitting (you do not need to have 10 cm, everyone’s hands and fingers are different), we form a hole for the thumb. Let's start with the left mittens. On the needle from the side of the palm (3rd needle) we knit 4 faces., 6 points we remove on a pin, we collect on the needle 6 points (so that there are 12 of them, as before), 2 faces.
The hole for the thumb of the right mitten is knitted symmetrically, i.e. on the second needle from the side of the palm: 2 faces., 6 p. we remove on a pin, we collect on the knitting needle 6 p., 4 persons.
Cape formation we carry out after the little finger on the hand is closed.

For a rounded toe, knit two middle loops together on each spoke.
Turn down the loops in each row until only 1 p. (Total 4) remains on the needles. After that, tear off the thread of the ball and push it into the needle. Catch the needle with all 4 points, pull off and fasten mittens from the inside.
After two mittens are knitted, we start knitting the thumb. To do this, we remove the 6 pp from the pin by the knitting needle, we collect 6 p. On the parallel row and we collect 4 p. On the two side rows. Total it turned out 20 p., We distribute them to 4 needles (5 p. On a spoke).

And knit circular rows of people. up to the required finger length. We form the toe of a finger in the same way as the formation of a toe mitten.
Done!
Knitting mittens for children
Kids love it when their mother creates, for example, beautiful chanterelles or bears that you can put on pens and go play snowballs.
Knitted baby mittens with owls
For a child, there is nothing more interesting than mittens with a pattern. He carries such things with great pleasure, so I suggest we please the child with marvelous owls.

Materials and tools:
1 hank;
stocking needles number 1.5;
additional knitting needle or special loop release;
needle for yarn;
four beads;
thread and needle for sewing beads.
Mittens knit in two threads.
So, we collect 32 loops, distribute them into 4 needles (8 each).
1 - 10 rows: gum 1 person. x 1 out.
11 row: individuals.
12 row: persons .; add broaches of 2 persons. on each needle
13 - 18 rows: individuals.
19 row: we begin to knit an owl on 12 loops of the third and fourth spokes. The first needle - persons .; the second needle - persons .; the third needle - 4 persons., 6 ex .; the fourth needle - 6 out., 4 persons.
20 row: the same as the 19th.

21 row: the first knitting needle - persons .; the second knitting needle - 2 persons., remove 6 loops for a thumb hole on a pin, dial 6 additional loops, 2 persons; the third needle - 4 persons., 2 out., 4 persons .; the fourth needle - 4 persons., 2 out., 4 persons.
22, 23 rows: the first knitting needle - persons .; the second needle - persons .; the third needle - 4 persons., 2 out., 4 persons .; the fourth needle - 4 persons., 2 out., 4 persons.
24 row: the first knitting needle - persons .; the second needle - persons .; the third needle - 4 persons., 2 out., 2 loops to remove on the add. knitting needle at work, knit the next two loops of individuals., then loops on add. spoke - persons .; the fourth needle - remove two loops on the add. knitting needle before work, knit the following two persons., then loop on the add. spoke - persons., 2 ex., 4 persons.
25 - 31 rows: the first knitting needle - persons., The second knitting needle - faces., The third knitting needle - 4 persons., 2 years, 4 people; the fourth needle - 4 persons., 2 out., 4 persons.
32 row: same as the 24th
33 - 35 rows: the first needle - persons .; the second needle - persons .; the third needle - 4 persons., 2 out., 4 persons .; the fourth needle - 4 persons., 2 out., 4 persons.
36 row: the same as the 24th and 32nd.
37 row: the first knitting needle - persons .; the second needle - persons .; the third knitting needle - 4 persons., 2 ex., 2 persons., 2 ex .; the fourth needle - 2 out., 2 persons., 2 out., 4 persons.
38 - 41 rows: the first needle - persons .; the second needle - persons .; the third needle - 4 persons., 6 ex .; the fourth needle - 6 out., 4 persons.
39 row: begin to subtract. The first needle is to knit the first 2 loops together of the faces. behind the back wall; The second needle is to knit the last 2 loops of the faces. behind the front wall; the third knitting needle is to knit the first 2 loops together of the faces. behind the back wall; the fourth knitting needle is to knit the last 2 loops of the faces. for the front wall. The rest of the loop to knit on the pattern (face. And izn.)

When only 8 loops remain on the needles - we pinch them with a needle. For the thumb, we transfer the 6 loops that were shot to the pin onto the knitting needle, and from the edges we need 2 + 6 + 2 loops from the edges.


Bullfinch Ideas (Embroidery)
Having on hand simple mittens, you can decorate them with original embroidery, which will look gorgeous in a children's kit.


Video lessons from the best masters
YouTube today has become a real treasure, where you can find a huge number of training videos. For example, in the blogs of Svetlana Bersanova video tutorial can be viewed for free. And such good author is not enough. You can find a mentor for the soul and get the most valuable knowledge absolutely free.
Original mice or white hedgehogs for kids
How to knit mittens
Warm openwork for a girl (double mohair)
Part 1
Part 2
Interesting two-color minions for a boy of 7-8 years
Jacquard products (video tutorials)
Jacquard with a winter theme is a classic that will always be relevant, so I propose to move on to the most complex options that require maximum time and attention to detail.
Original knitting with ornament (Norwegian patterns)
For girls with deer
If you want to learn how to knit a complex, but very original “deer” pattern, this lesson with a detailed description will help you.
Men's Aran mittens for little men
If you learn all the lessons offered by us, you will be able to fantasize and create products of any complexity: women's fingerless gloves, convertible, with a false pattern, from thick yarn and embroidery. Good luck in your endeavors. Try, experiment and indulge your home with nice bundles.